
How to make a backup of a flash drive
Backup your flash drive to your PC's hard drive or an external drive or backup to a flash drive
Many of us use USB flash drives to store and transfer files between work and home. Flash drives are convenient; you can edit files directly on them, whether at work, at home, or anywhere else, because all the necessary work files are always with you. And it's safer if the files are confidential.
IMPORTANT! To prevent data on your flash drive from falling into the wrong hands, encrypt it using Bitlocker, a program included with Windows. When you go out with an encrypted flash drive, you'll always be confident in the security of your data.
Flash drives are typically used in various weather conditions: rain, dampness, frost, and are susceptible to mechanical damage and electromagnetic waves. They can also be lost or stolen, etc. The only reliable way to preserve your data is to perform a daily backup of your flash drive to your PC's hard drive, laptop, or network drive.
Where to save backups of a flash drive?
You can back up your flash drive to various storage devices:
- your computer's hard drive (HDD,) or solid-state drive (SSD)
- external USB drive (removable drive)
- another flash drive
- network drive, NAS server on your local network
- remote server via FTP, SFTP (SSH)
Let's look at an example of how to automatically back up a flash drive to a PC's hard drive every 3 hours.
Benefits of Exiland Backup for backing up data from flash drives
- Ability to run a backup job by event when a flash drive is connected to a USB port. It's very convenient – you plug the flash drive into your PC and within a few seconds a backup is automatically created.
- Ability to specify a path by volume name. The source folder can be specified as <FLASH>:\Source\Folder, where FLASH is the flash drive's volume name. This solves the problem of flash drives being mounted under different drive letters in Windows. Therefore, if the removable drive is mounted under a different drive letter, you won't have to reconfigure anything in the program. This is very convenient.
Let's look at how to easily set up copying a flash drive to a PC's hard drive using Exiland Backup
How to backup a flash drive. Configuring Exiland Backup
To get started, please download the backup program, unzip the archive, run the "setup.exe" file, and install the program on your PC following the on-screen instructions. If you downloaded the Portable version of the Exiland Backup, simply run "ExilandBackup.exe" from the program folders. After installation, launch Exiland Backup. The main program window will appear. The top list initially doesn't contain any backup jobs. You need to create a job that will backup the flash drive files.
To create a new backup job, click the "Create" button located on the top panel. A step-by-step wizard will appear on the screen.
Step 1: Job Name
Type any name of your backup job, for example, "My Flash Drive". Then click on the "Next" button.
Step 2: Backup Type
Select the "Creation of backups" radio button. Then, if the volume of flash drive data is large, select the Incremental backup type. Otherwise, select "Full backup".
Click "Next".
Step 3: Source files and folders
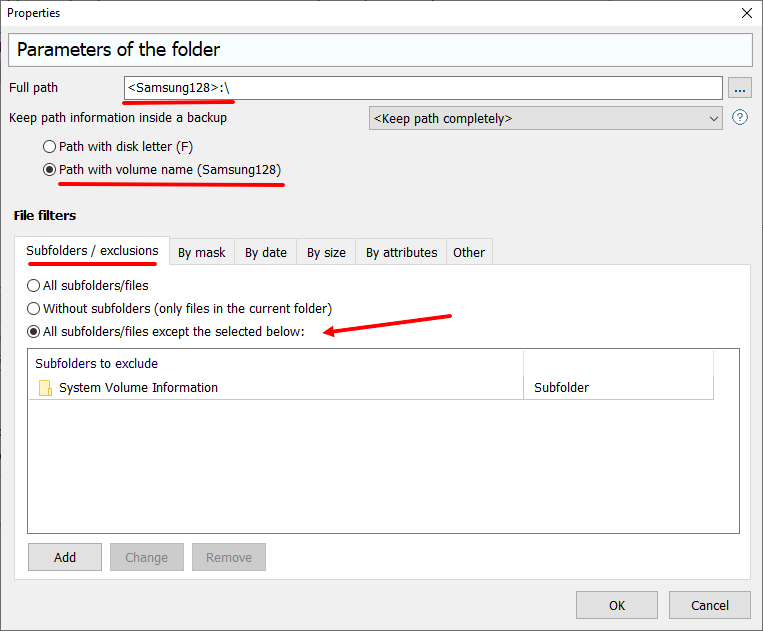
To specify your source files to be backed up, click "Add – Local/Network files and folders". Specify the root of your flash drive like "E:\" and switch to "Path with volume name" to avoid depending on a drive letter each time you connect the flash drive to USB port. Thus, the path to the flash drive will be specified by the volume name. This is very important!
Step 4: Compression
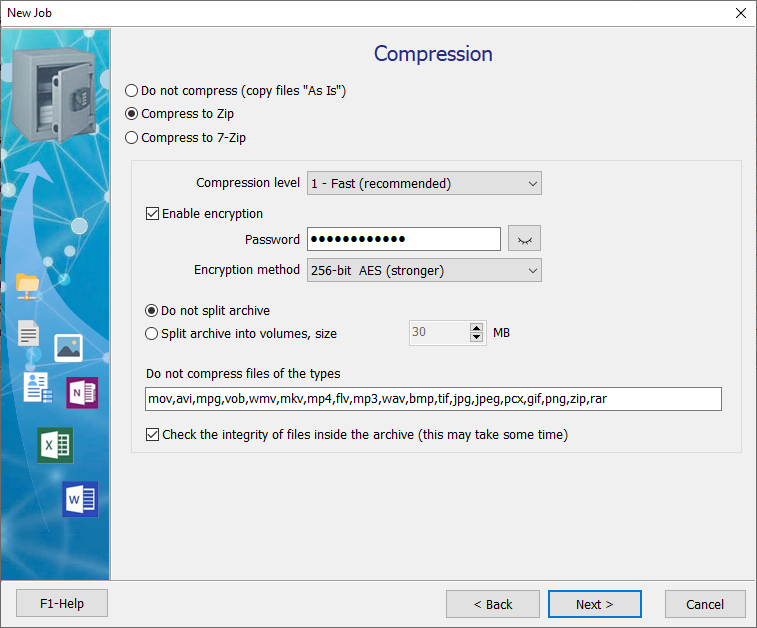
Select "Compress to Zip" and specify archiving settings. Then click "Next".
Step 5: Where to save backups
Click "Add - Local / Network Folder", then select the folder to save backups (for example, "D:\Backups"). You can specify multiple storages if necessary.
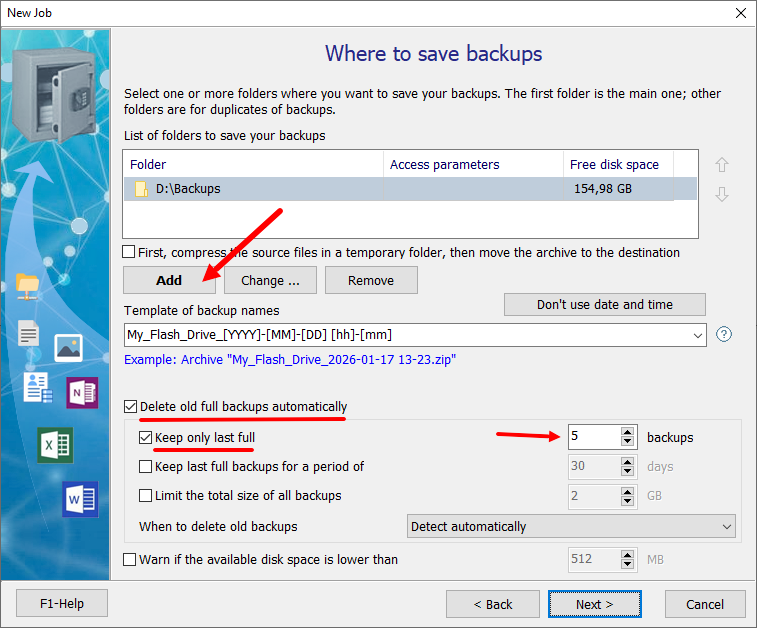
Specify automatic deletion of full backups and limit their number.
Step 6: Schedule
If you have the fiull version of Exiland Backup, click "Enabled" and specify the schedule for the backup job to start, for example, "By event (trigger) - On connecting a removable device (flash drives, removable drives)”

Click "OK", then "Next"
Click "Finish" to complete the backup job creation.
If you have the demo version of Exiland Backup, click the "Run" button located on the top panel and watch the backup process. If you have the full version of Exiland Backup, connect your flash drive to the USB port of your PC and the backup will start.
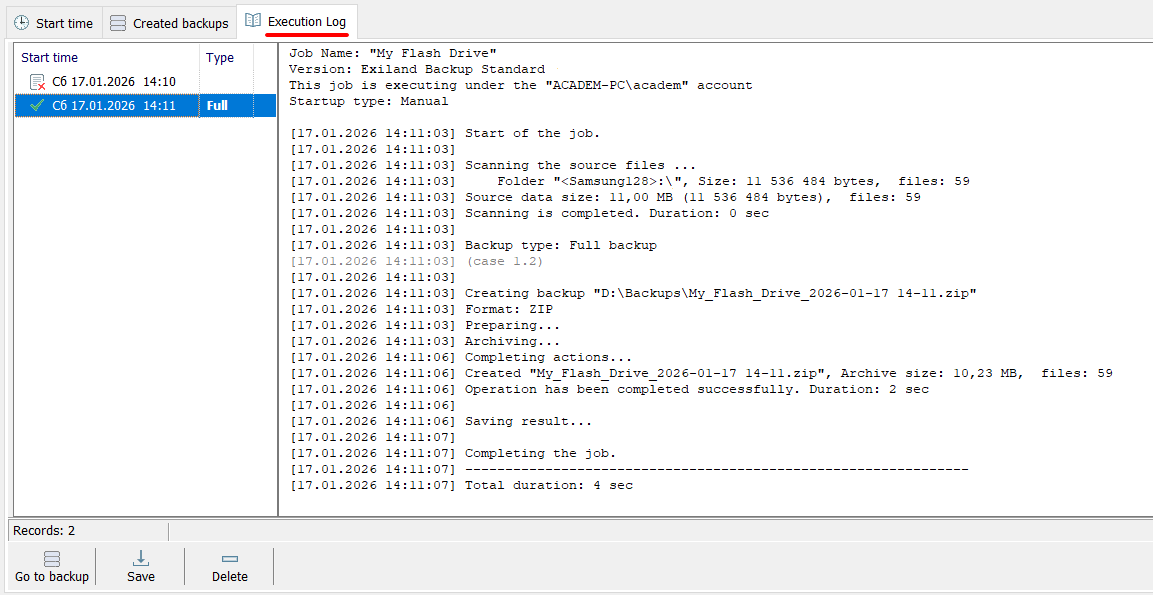
The result is a created Zip archive, which is displayed on the "Created backups" tab. Having a backup of your flash drive, you can restore your files at any time.