Documentation of Exiland Backup
Starting Exiland Backup
Interfaces of Standard and Professional are similar. Interface of Standard are shown below.
The Professional version has additional panel of the service control.
Main Window
You can start Exiland Backup through the Start menu.
After you start Exiland Backup, you will see the main window of the program.
Exiland Backup displays icon in the system tray at the bottom right corner of the screen.
The main window is divided into two parts: a list of backup jobs at the top and the job details tabs below.
In addition, the main window contains the main menu, and the toolbar at the top.
The job list may contain a list of jobs and groups. It is empty when the program is opened for the first time because no jobs have been created yet.
You can adjust a columns width, position and visibility. To change position and visibility enter to common settings of the program.
Groups are used for the grouping of jobs by theme or are used to run jobs consecutively.
If you have several jobs, you can merge these into a group. For this, you must create a new group first. To move a job to an existing group, use the menu "Job" or context menu (right-click the job and then select "Move job to group").
Every job has important properties that are visible in the columns of the list: Name of Jobs, Backup Type, Destination folders, Duplication, Schedule, etc.
You need to create a new backup job first.
Click the "Create" button, specify a Job Name, select the files and folders to backup, select the location to save your backups to, and then set the schedule.
The bottom part of the main window contains the following tabs:
- Start time
- Created backups
- Execution Log
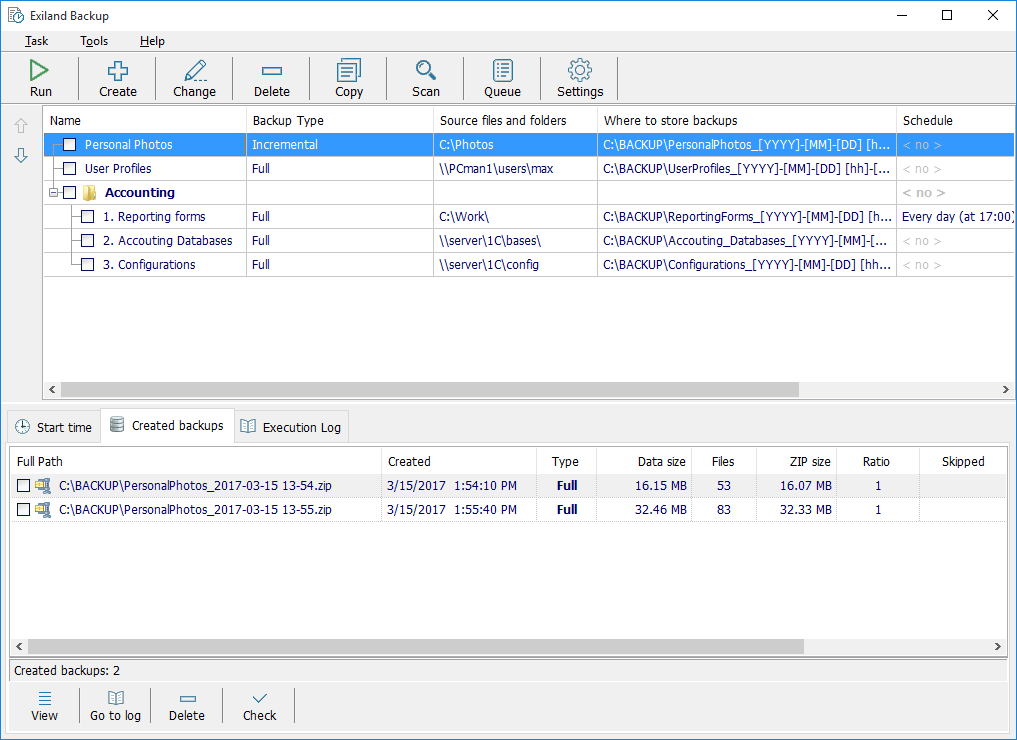
Figure 1. Main Window
Tab "Start time"
Here, you can see each starting time of the job/group if the job schedule is set. The program automatically calculates the timetable according to the specified schedule.
Tab "Created Backups"
After creating backups, they appear in the backups list in the "Created backups" tab for each backup job (except synchronization).
The full path on the disk to the backup is shown in the first column.
If a backup was stored in several storage locations, then you can expand the node on the left by clicking the "+" button to view storage locations. Other columns contain the parameters of the created backups.
You can adjust a columns width, position and visibility. To change position and visibility enter to common settings of the program.
For each backup you can:
- view and restore files
- go to log
- delete
- check the existence of a backup on a disk
To get more information go to the section Restoring files from backup
Tab "Execution Log"
During the job/group execution of each step, information is written to the log.
Icons are used to display status of finished jobs and may be following:
") |
- backup was created successfully |
") |
- warning(s) only |
") |
- error(s) and/or warning(s) |
 |
- No error(s), but the backup was not created |
 |
- Job was cancelled |
Aborted jobs do not have any icon.
To show the log, you must select the time on the left. After selecting the record, you can:
- Go to backup
- Save to file
- Delete
Main Toolbar
The toolbar contains buttons with common operations for backup jobs and groups. In addition, these operations are accessible from the main menu.
The "Settings" and "Queue" buttons are also accessible.
After the job selection, you can change its settings by clicking the "Properties" button, and delete, run, or copy the job with another name if you wish to create a new job on an existing job basis.
To edit the common settings, click the "Settings" button.
To show the dialog "Jobs Queue", click the "Queue" button. This button is intended to show the jobs queue of the jobs that are to be performed.
Main Menu
The main menu contains various items such as Job, Tools, and Help.
The "Job" item contains subitems with common operations for backup jobs and groups. These operations are available by right-clicking a job/group.
The "Tools" item contains subitems to common program settings and also items "Set password" and "Open work folder with the jobs settings".
You can set a password to restrict access to the Exiland Backup settings. This password will be requested when starting the program.
Opening the work folder with the jobs settings may be needed to backup the "ExilandBackup.tid" file, for example, if you plan to reinstall the operating system. In this case, you can replace this settings file after installing Windows.
The "Help" item contains the helping system, registering subitems, and website links.